October might just be my favorite month. The weather gets cooler, the leaves begin to change, and it wraps up with one of the most fun holidays: Halloween! For years, I threw Halloween parties for my 3 stepsons. I could have anywhere from 12 to 15 boys, ages 7 to 14, jacked up on sugary goodness, running around my house.

I can’t lie. It was some serious work – the preparations before the party, finding the right balance of fun and frightening for the kids, cleaning up after the party. Phew!
But the “boys” are much older now and those are still some of our fondest memories together, so it was worth every bit of energy. Today, I am more than happy to carry on the tradition with my 6 year old daughter. Like starting all over, I look forward to surprising her with new decorations each year, creating spooky soundtracks for her parties, and cooking up all the creepy treats. Plus one of the best parts: watching her and her friends grow up together, just as I did with her brothers.
Vampire Cupcakes
- 1 box devil’s food cake
- 1 14 once container whipped strawberry icing
- 1 14 once container whipped chocolate icing
- 1 bag white chocolate chips
- red food coloring
You will also need:
- wax paper
- piping bag or gun with very small tip (If you don’t have one, a small sandwich bag can be used.)
- cupcake corer (If you don’t have one, you can use a small paring knife or a large icing decorating tip.)
Prepare cake mix according to box instructions, making 24 cupcakes, then let cool.

Meanwhile, prepare your icing bag. If using a plastic bag, cut a very, very small hole in one corner.

Melt about 1/3 cup of white chocolate chips in microwave for 30 second intervals until smooth. Pour into bag and slowly pipe icing in a V-shape, filling in the middle, for your vampire teeth. For 24 cupcakes, you will need 48 teeth. Make some extras, as some will break.
NOTE: White chocolate hardens very quickly, so be sure to be ready to pipe all teeth at once. If you stop for any reason, check your tip for any chocolate clogs before beginning to pipe again. Otherwise, it will not pass through and you’ll squeeze until your bag explodes. Ask me how I know, haha.
Once teeth are hardened, pour a small amount of red food coloring into the food coloring cap. Slowly peel teeth from wax paper and dip the end of teeth into coloring. Place back on wax paper.
NOTE: Food coloring will not fully dry. This creates a nice effect, just use caution around them as they will get you “bloody.”

Next, use your cupcake corer or knife to put small holes in the middle of your cupcakes. If using an icing tip, just punch into cupcake, twist, and pop out the middle. Use a knife to get the cored remnants out of the tip. (And save them for fun snacking later!)

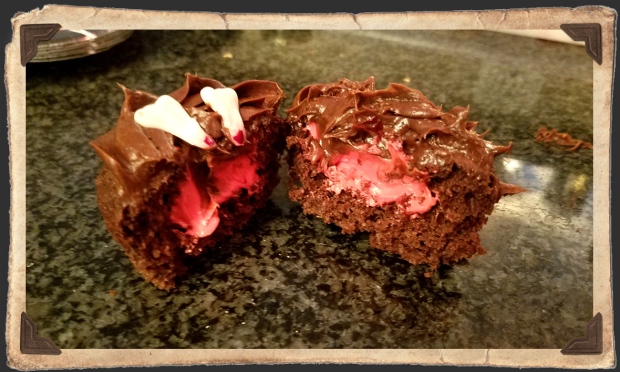
In a bowl, mix your strawberry icing with enough red coloring to make it look bloody. Use your cleaned icing gun or a new sandwich bag with a slightly larger hole to fill the middle of your cupcakes with the bloody icing.

Clean out icing gun and fill with chocolate icing. Ice the tops of the cupcakes, enough to fully cover the red icing. If you don’t have the gun, just ice with a butter knife or spatula. Top cupcakes with vampire teeth and TA-DA! Vampire Cupcakes!

These were my daughter’s special request for her (slightly early) Halloween party, where I had a house full of 6-year-olds. Had this been for an adult party, I may have filled the cupcakes with some raspberry or strawberry jam. Mmmm. That would be yummy. Maybe next year…

Happy Halloween!